Imola Setup F1 22 Fastest Race Time Trial Guide 2022
Imola Setup: Best race setup, Fastest qualifying setup, Time Trial, Coop Career setup for F1 22
Welcome to our F1 22 Imola Setup page!
In order to achieve the fastest Imola setup in F1 22, there are a few key things to bear in mind. Firstly, Imola is a fast and flowing circuit, so aerodynamic efficiency is critical. Secondly, Imola is quite bumpy, so a good suspension setup is crucial in order to maintain grip and stability through the corners. Finally, Imola is notoriously hard on brakes, so it’s important to have a good brake setup. With these things in mind, the following Imola setup should help you to achieve the fastest possible lap time.
For the F1 2021 Imola setup click here!
Hot Lap Setup
Table of Contents
Race Setup
Our 2021 Imola setup was incredibly popular last season, with over 50,000 players using it in-game! No pressure for the F1 22 setup then…
See our race setup below, with the time trial setup at the bottom of the page. Be sure to bookmark this page and check back in the future for improvements!
Aerodynamics Setup
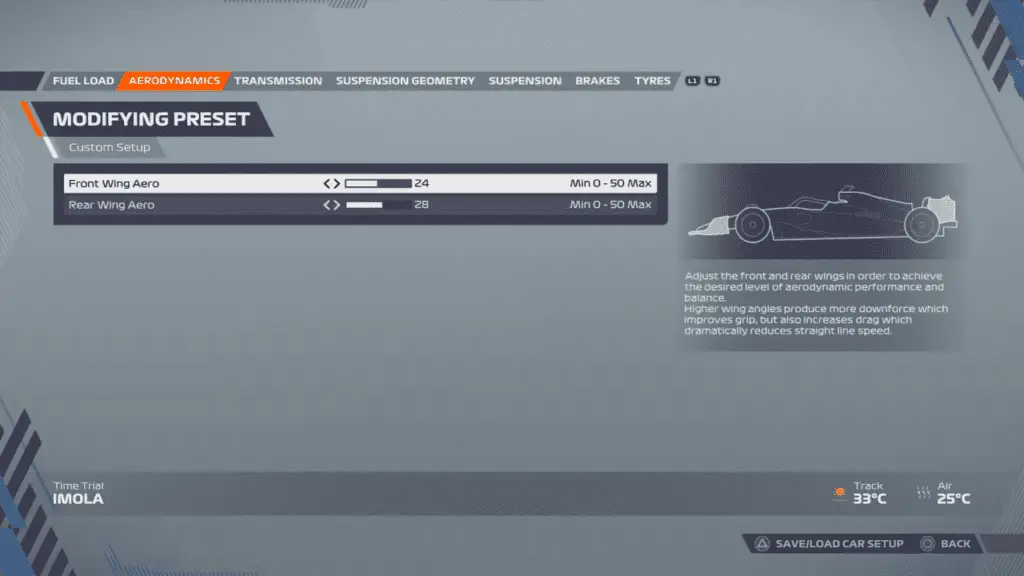
Front Wing Aero – 24
Rear Wing Aero – 28
For Imola and with the new aero settings, we are recommending 24-28 wing angle setup. This is low enough to keep the car fast down the straights, with just enough downforce to get us through the corners. Our initial impression is that the cars in F1 22 seem to perform better than 2021 with lower aero settings. If you are struggling with grip, try increasing both values, but be aware you may find it harder to overtake.
Transmission Setup
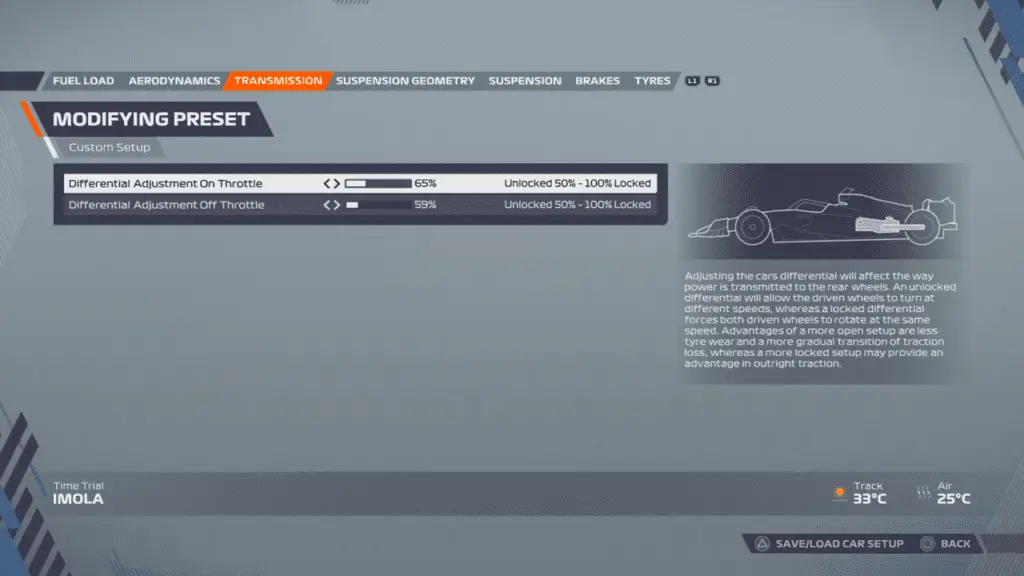
Differential Adjustment On Throttle – 65%
Differential Adjustment Off Throttle – 59%
Transmission is a critical area of the setup for traction, affecting acceleration, grip, rotation, tyre wear, and drivability. Increasing the On Throttle Differential will make the car more stable on acceleration, however, will increase tyre wear. Here at Imola, we’ve went brave again and have had most success with a 65%/59% setup. This will aid rotation in lower speed corners and should help protect the tyres from excessive wear, however be cautious as one your tyres wear the car may be more likely to spin. If you don’t have masterful abilities without traction control, then try increasing the on throttle diff. This will improve straight-line stability and even acceleration on corner exits, however, will come with a slight cost on wear.
Suspension Geometry Setup
Front Camber – -2.50°
Rear Camber – -1.90°
Front Toe – 0.05°
Rear Camber – 0.20°
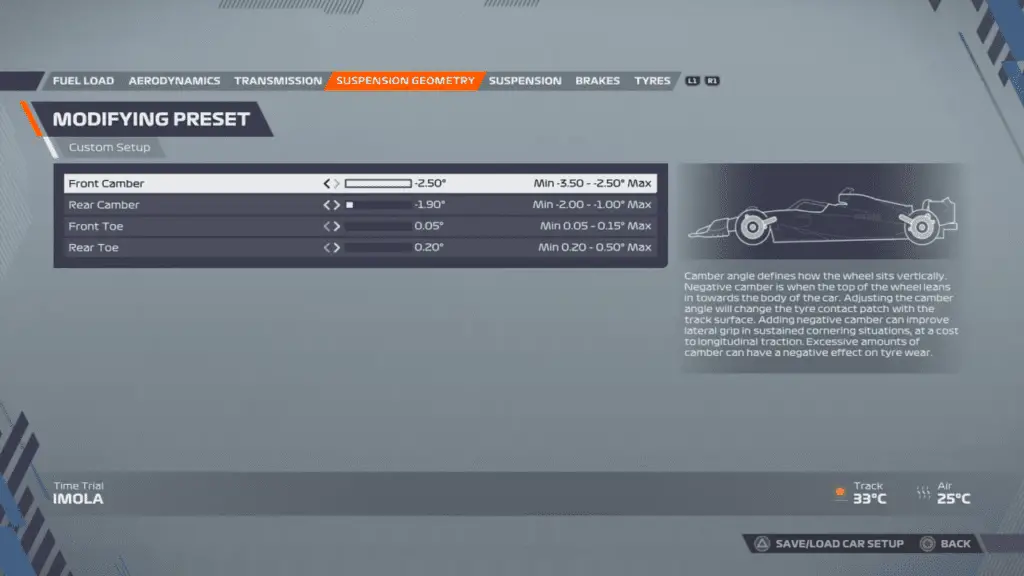
Geometry adjustments mainly impact grip and tire wear, however on F1 22, like F1 2021, most circuits suit the same setup! Stick with high front camber, and low everything else in this section for best results. We’ve knocked the rear camber up one notch from the lowest for Imola.
Suspension Setup
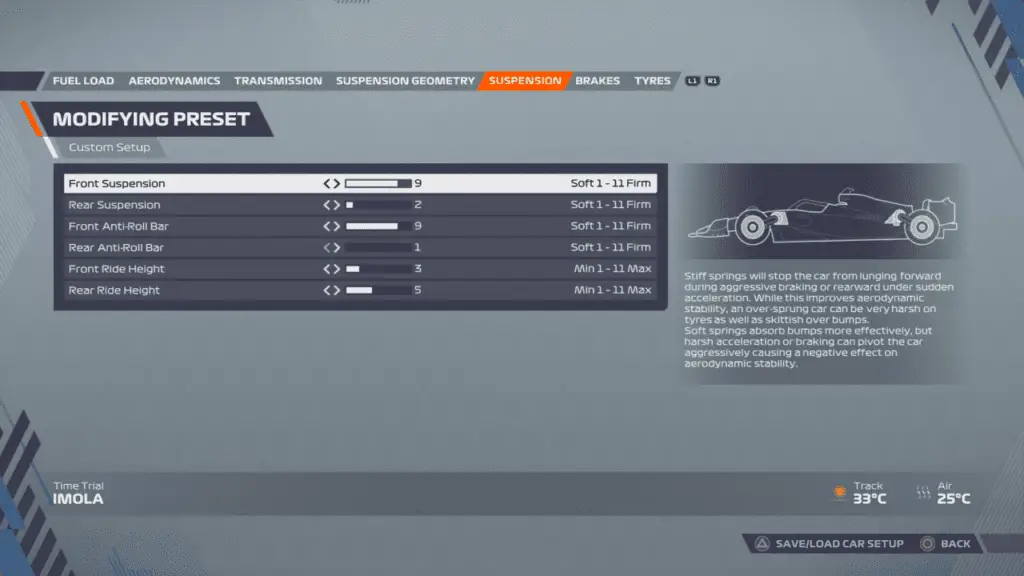
Front Suspension – 9
Rear Suspension – 2
Front Anti-Roll Bar – 9
Rear Anti-Roll Bar – 1
Front Ride Height – 2
Rear Ride Height – 5
Suspension adjustments impact responsiveness and stability through corners. This is probably the most important area of the Imola setup, so if you are struggling with rotation then the anti-roll bars are where you should start. Ride height plays a much more important role this year, so the keep the rear high to avoid the diffuser bottoming out at high speed. Floor damage can ruin performance, so a higher than usual ride height here should help protect those delicate aerodynamic surfaces.
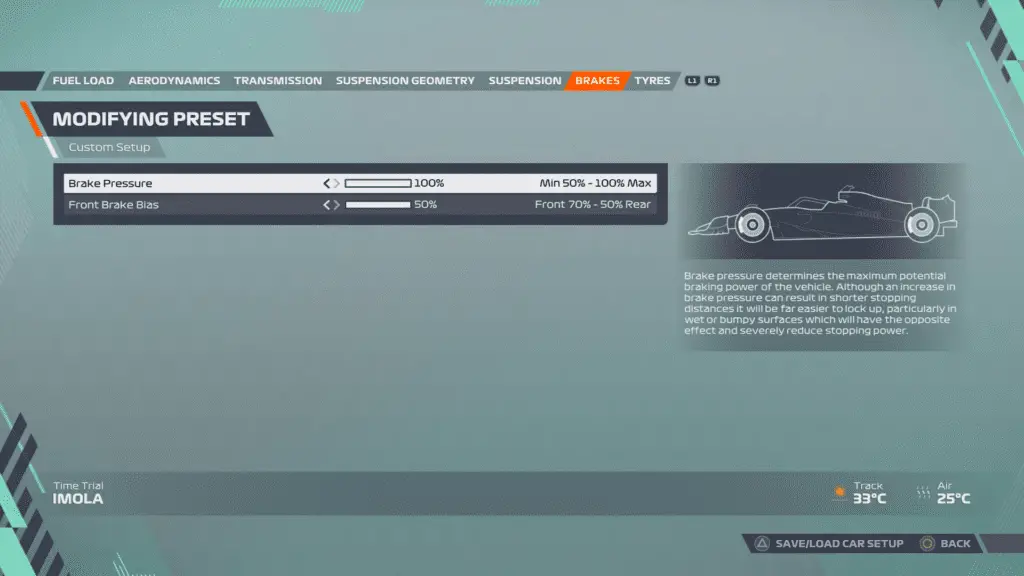
Brakes Setup
Brake Pressure – 100%
Front Brake Bias – 50%
For players on controller, brake pressure adjustments can have minimal impact. If you use ABS, maintain 100% brake pressure. Otherwise, see above for the Imola brake setup.
Tyres Setup
Front Right Tyre Pressure – 23.7 psi
Front Left Tyre Pressure – 23.7 psi
Rear Right Tyre Pressure – 22.2 psi
Rear Left Tyre Pressure – 22.2 psi
Tyre pressures can have a huge impact on wear and traction. Typically high rear pressures and lower front pressures are the way to go, however increasing rear pressures here could result in faster lap times. You will pay in wear, but if you are finding this not to be an issue then increase to around 22.7psi. For the Imola setup we are running a relatively high pressure setup, you might want to reduce the pressures by one or two notches if you struggle with excessive wear.
Imola Hotlap Setup
This is the fastest F1 22 Imola Setup available, and will ensure you rise to the top of the time trial leaderboards. F1 2022 is still new, so check back here in the future for faster and faster setups. Generally this setup will be quick over one lap, so it’s ideal for time trial, or even qualifying, but be aware it is not designed to be run over a race distance, so don’t expect your tyres to last very long!
Imola Suspension Setup
Front Wing Aero – 24
Rear Wing Aero – 28
For the best time trial setup for Imola in F1 22, we are actually recommending the same aero as our standard race setup. Despite a few tweaks, this seems to always result in the fastest times. 24 at the front, 28 at the rear.

Imola Transmission Setup
On Throttle Diff – 60%
Off Throttle Diff – 54%
A differential setup here similar to the race setup, but we have reduced the on throttle differential adjustment to 60%, and the off throttle to 54%. This makes the car easier to rotate, meaning you can accelerate faster out of corners once the car is straight. It will be slightly more challenging to handle, but much quicker round the Imola track.
Imola Suspension Geometry Setup
Front Camber – -2.50°
Rear Camber – -1.00°
Front Toe – 0.05°
Rear Camber – 0.20°
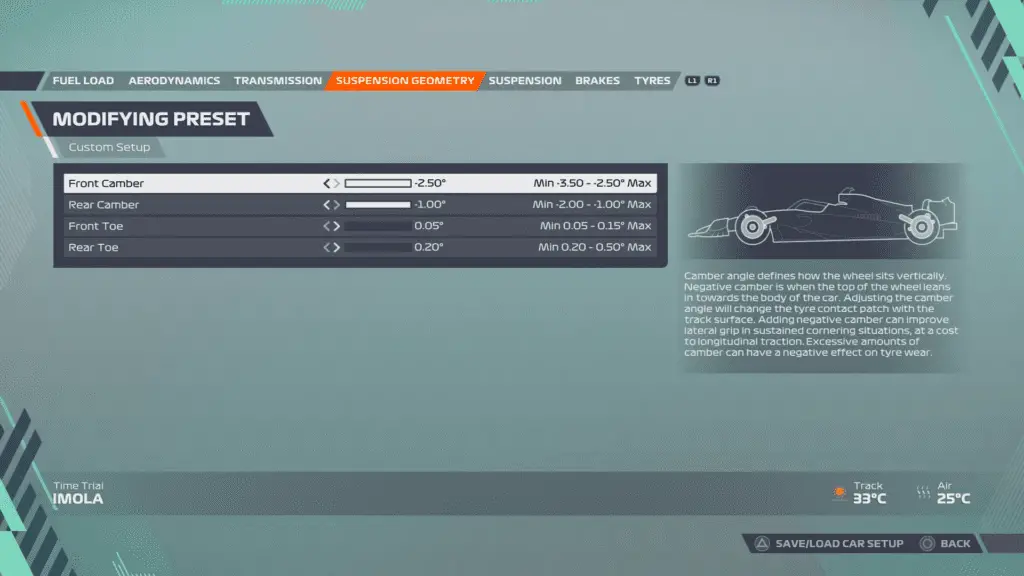
Suspension adjustments impact responsiveness and stability through corners. F1 2022 is similar to F1 2021, and this section pf the setup has a similar impact. Imola is like most circuits in terms of geometry setup, right-right-left-left.

Imola Suspension Setup
Front Suspension – 9
Rear Suspension – 2
Front Anti-Roll Bar – 9
Rear Anti-Roll Bar – 1
Front Ride Height – 3
Rear Ride Height – 5
The Imola suspension setup is a bit more extreme than the race settings. A very firm front, with a lot of give at the rear. This allows the rear of the car to take high cornering loads, but makes the front very skittish. Our advice here is to avoid riding over kerbs, and accelerate as early as possible on the way out of corners.
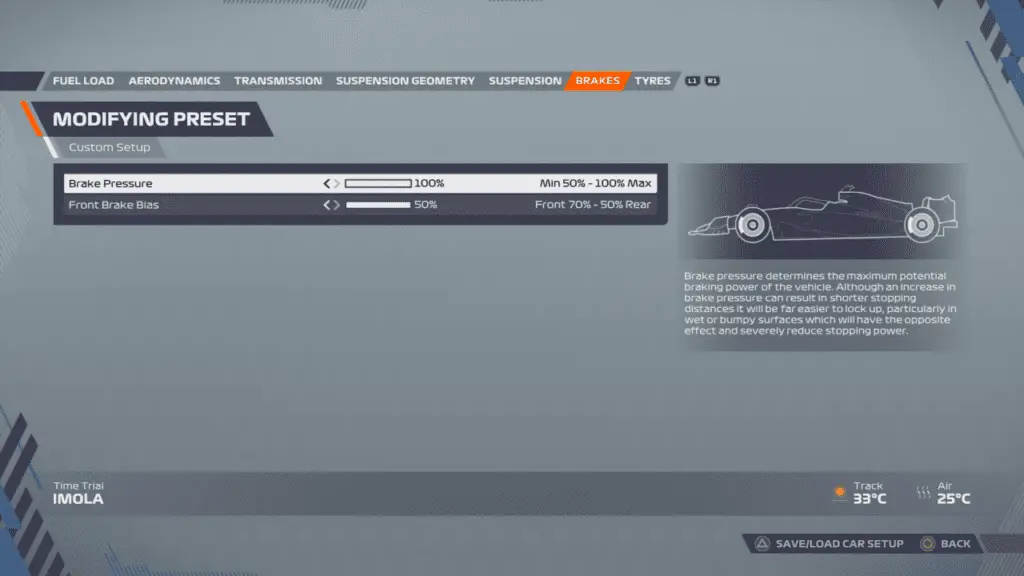
Imola Brakes Setup
Brake Pressure – 100%
Front Brake Bias – 50%
Maximum brake pressure here, but you can run ABS and not lose any time.
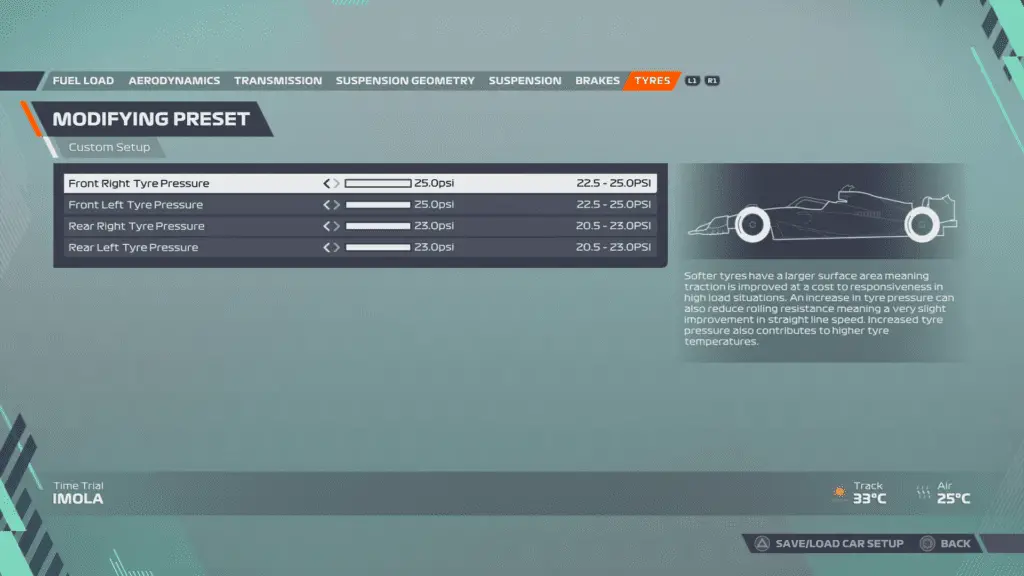
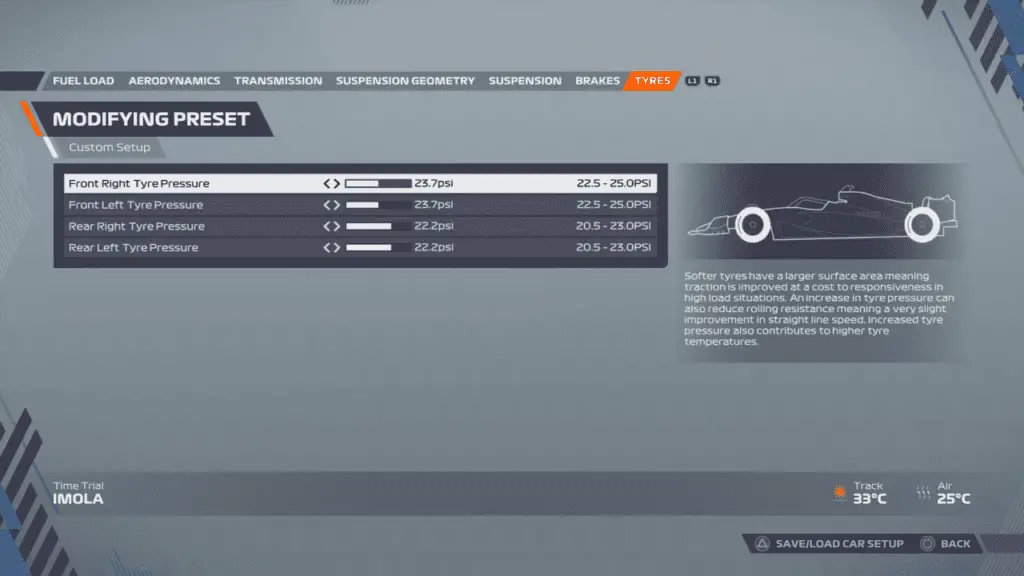
Imola Tyre Pressure Setup
Front Right Tyre Pressure – 25.0psi
Front Left Tyre Pressure – 25.0psi
Rear Right Tyre Pressure – 23.0psi
Rear Left Tyre Pressure – 23.0psi
An extreme setup here for maximum speed at Imola. Very fast, but very hot! Don’t expect your tyres to last longer than a few laps with these settings.
Imola Setup F1 22 Fastest Race Time Trial Guide 2022
Imola Setup: Best race setup, Fastest qualifying setup, Time Trial, Coop Career setup for F1 22
Welcome to our F1 22 Imola Setup page!
In order to achieve the fastest Imola setup in F1 22, there are a few key things to bear in mind. Firstly, Imola is a fast and flowing circuit, so aerodynamic efficiency is critical. Secondly, Imola is quite bumpy, so a good suspension setup is crucial in order to maintain grip and stability through the corners. Finally, Imola is notoriously hard on brakes, so it’s important to have a good brake setup. With these things in mind, the following Imola setup should help you to achieve the fastest possible lap time.
For the F1 2021 Imola setup click here!
Hot Lap Setup
Table of Contents
Race Setup
Our 2021 Imola setup was incredibly popular last season, with over 50,000 players using it in-game! No pressure for the F1 22 setup then…
See our race setup below, with the time trial setup at the bottom of the page. Be sure to bookmark this page and check back in the future for improvements!
Race Setup
Our 2021 Imola setup was incredibly popular last season, with over 50,000 players using it in-game! No pressure for the F1 22 setup then…
See our race setup below, with the time trial setup at the bottom of the page. Be sure to bookmark this page and check back in the future for improvements!
Aerodynamics Setup
Front Wing Aero – 24
Rear Wing Aero – 28
For Imola and with the new aero settings, we are recommending 24-28 wing angle setup. This is low enough to keep the car fast down the straights, with just enough downforce to get us through the corners. Our initial impression is that the cars in F1 22 seem to perform better than 2021 with lower aero settings. If you are struggling with grip, try increasing both values, but be aware you may find it harder to overtake.
Transmission Setup
Differential Adjustment On Throttle – 65%
Differential Adjustment Off Throttle – 59%
Transmission is a critical area of the setup for traction, affecting acceleration, grip, rotation, tyre wear, and drivability. Increasing the On Throttle Differential will make the car more stable on acceleration, however, will increase tyre wear. Here at Imola, we’ve went brave again and have had most success with a 65%/59% setup. This will aid rotation in lower speed corners and should help protect the tyres from excessive wear, however be cautious as one your tyres wear the car may be more likely to spin. If you don’t have masterful abilities without traction control, then try increasing the on throttle diff. This will improve straight-line stability and even acceleration on corner exits, however, will come with a slight cost on wear.
Suspension Geometry Setup
Front Camber – -2.50°
Rear Camber – -1.90°
Front Toe – 0.05°
Rear Camber – 0.20°
Geometry adjustments mainly impact grip and tire wear, however on F1 22, like F1 2021, most circuits suit the same setup! Stick with high front camber, and low everything else in this section for best results. We’ve knocked the rear camber up one notch from the lowest for Imola.
Suspension Setup
Front Suspension – 9
Rear Suspension – 2
Front Anti-Roll Bar – 9
Rear Anti-Roll Bar – 1
Front Ride Height – 2
Rear Ride Height – 5
Suspension adjustments impact responsiveness and stability through corners. This is probably the most important area of the Imola setup, so if you are struggling with rotation then the anti-roll bars are where you should start. Ride height plays a much more important role this year, so the keep the rear high to avoid the diffuser bottoming out at high speed. Floor damage can ruin performance, so a higher than usual ride height here should help protect those delicate aerodynamic surfaces.
Brakes Setup
Brake Pressure – 100%
Front Brake Bias – 50%
For players on controller, brake pressure adjustments can have minimal impact. If you use ABS, maintain 100% brake pressure. Otherwise, see above for the Imola brake setup.
Tyres Setup
Front Right Tyre Pressure – 23.7 psi
Front Left Tyre Pressure – 23.7 psi
Rear Right Tyre Pressure – 22.2 psi
Rear Left Tyre Pressure – 22.2 psi
Tyre pressures can have a huge impact on wear and traction. Typically high rear pressures and lower front pressures are the way to go, however increasing rear pressures here could result in faster lap times. You will pay in wear, but if you are finding this not to be an issue then increase to around 22.7psi. For the Imola setup we are running a relatively high pressure setup, you might want to reduce the pressures by one or two notches if you struggle with excessive wear.
Imola Hotlap Setup
This is the fastest F1 22 Imola Setup available, and will ensure you rise to the top of the time trial leaderboards. F1 2022 is still new, so check back here in the future for faster and faster setups. Generally this setup will be quick over one lap, so it’s ideal for time trial, or even qualifying, but be aware it is not designed to be run over a race distance, so don’t expect your tyres to last very long!
Imola Hotlap Setup
This is the fastest F1 22 Imola Setup available, and will ensure you rise to the top of the time trial leaderboards. F1 2022 is still new, so check back here in the future for faster and faster setups. Generally this setup will be quick over one lap, so it’s ideal for time trial, or even qualifying, but be aware it is not designed to be run over a race distance, so don’t expect your tyres to last very long!
Imola Suspension Setup
Front Wing Aero – 24
Rear Wing Aero – 28
For the best time trial setup for Imola in F1 22, we are actually recommending the same aero as our standard race setup. Despite a few tweaks, this seems to always result in the fastest times. 24 at the front, 28 at the rear.
Imola Transmission Setup
On Throttle Diff – 60%
Off Throttle Diff – 54%
A differential setup here similar to the race setup, but we have reduced the on throttle differential adjustment to 60%, and the off throttle to 54%. This makes the car easier to rotate, meaning you can accelerate faster out of corners once the car is straight. It will be slightly more challenging to handle, but much quicker round the Imola track.
Imola Suspension Geometry Setup
Front Camber – -2.50°
Rear Camber – -1.00°
Front Toe – 0.05°
Rear Camber – 0.20°
Suspension adjustments impact responsiveness and stability through corners. F1 2022 is similar to F1 2021, and this section pf the setup has a similar impact. Imola is like most circuits in terms of geometry setup, right-right-left-left.
Imola Suspension Setup
Front Suspension – 9
Rear Suspension – 2
Front Anti-Roll Bar – 9
Rear Anti-Roll Bar – 1
Front Ride Height – 3
Rear Ride Height – 5
The Imola suspension setup is a bit more extreme than the race settings. A very firm front, with a lot of give at the rear. This allows the rear of the car to take high cornering loads, but makes the front very skittish. Our advice here is to avoid riding over kerbs, and accelerate as early as possible on the way out of corners.
Imola Brakes Setup
Brake Pressure – 100%
Front Brake Bias – 50%
Maximum brake pressure here, but you can run ABS and not lose any time.
Imola Tyre Pressure Setup
Front Right Tyre Pressure – 25.0psi
Front Left Tyre Pressure – 25.0psi
Rear Right Tyre Pressure – 23.0psi
Rear Left Tyre Pressure – 23.0psi
An extreme setup here for maximum speed at Imola. Very fast, but very hot! Don’t expect your tyres to last longer than a few laps with these settings.
Monaco F1 2022 Setup Fastest Race Hotlap Qualifying F1 22 Guide
F1 22 Monaco Setup: Full race setup, qualifying setup, drivability setup
F1 22 Monaco Setup: The Monaco Grand Prix is one of the most prestigious racing events in the world, renowned for its challenging track and stunning setting. The race is held every year at Circuit de Monaco, a 2.1-mile road course that weaves through the streets and squares of Monte Carlo, Monaco. Because the course features a large number of high-speed corners and no long straightaways, the Monaco Grand Prix requires a highly specialized setup from cars and drivers alike. In order to succeed on this tight, twisty circuit, drivers must have precise control over their vehicles, and cars must be optimized to provide maximum grip on both dry pavement and wet asphalt. Additionally, Monaco also features some of the narrowest roads in Formula 1 racing, requiring drivers to navigate shadows and guardrails carefully as they navigate each turn. Despite these challenges, however, racing teams continue to vie for victory at Monaco year after year due to its historical significance within motorsport and unparalleled beauty. Indeed, the Monaco Grand Prix truly captures the essence of what makes Formula 1 great: speed, skill, precision, and competitive spirit.
Hot Lap Setup
Table of Contents
Monaco Race Setup
Monaco is one of the most iconic circuits on the calendar, and home to the iconic Monaco Grand Prix. A circuit currently under threat of being dropped from the calendar, its twists and turns are some of the most challenging in the game. Patience is needed to master this track!
See our race setup below, with hotlap setup to come and refinements to follow. Be sure to bookmark this page and check back in the future for improvements!
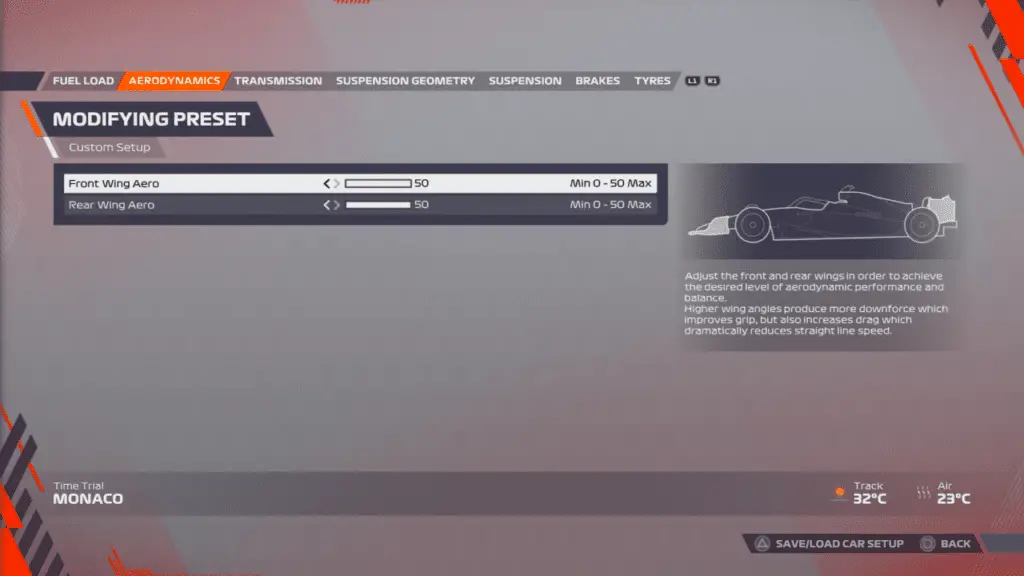
Aerodynamics
Front Wing Aero – 50
Rear Wing Aero – 50
With the new aero settings, we are recommending very high 50-50 wing angles here. We found this is simply the easiest way to approach this circuit. Overtaking will be challenging, and if you are really struggling you may find reducing the rear wing will help with top speed.
Transmission
Differential Adjustment On Throttle – 75%
Differential Adjustment Off Throttle – 54%
Transmission is a critical area of the setup for traction, affecting acceleration, grip, rotation, tyre wear, and drivability. Increasing the On Throttle Differential will make the car more stable on acceleration, however, will increase tyre wear. Here in Monaco we will use 75%/54%. This will aid rotation in lower speed corners and should help protect the tyres from excessive wear. Increasing rear diff will improve straight-line acceleration and stability on corner exits, however, will come with a slight cost on wear.
Suspension Geometry
Front Camber – -2.50°
Rear Camber – -1.00°
Front Toe – 0.05°
Rear Camber – 0.20°

Geometry adjustments mainly impact grip and tire wear, however on F1 22, like its predecessor, most circuits suit the same settings! Stick with high front values, and low rear values in this section for best results.
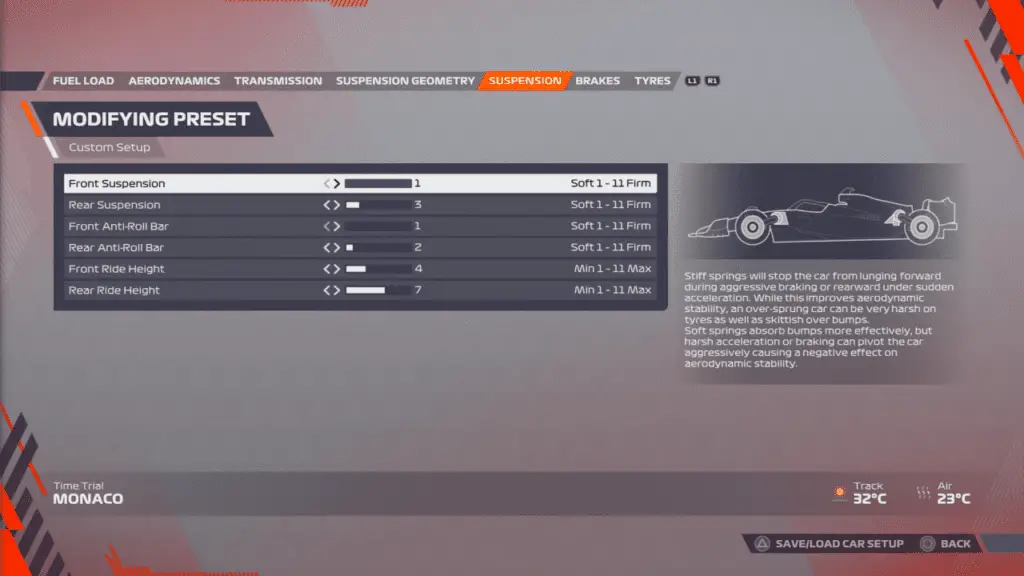
Suspension
Front Suspension – 1
Rear Suspension – 3
Front Anti-Roll Bar – 1
Rear Anti-Roll Bar – 2
Front Ride Height – 4
Rear Ride Height – 7
Suspension adjustments impact responsiveness and stability through corners. This is probably the most important area of the setup, so if you are struggling with rotation then the anti-roll bars are where you should start. Ride height plays a much more important role this year, so the keep the rear high to avoid the diffuser bottoming out at high speed. Floor damage can ruin performance, so a higher than usual ride height here should help protect those delicate aerodynamic surfaces.
Brakes
Brake Pressure – 95%
Front Brake Bias – 50%
For players on controller, brake pressure adjustments can have minimal impact. If you use ABS, maintain 100% brake pressure. Otherwise, see above.

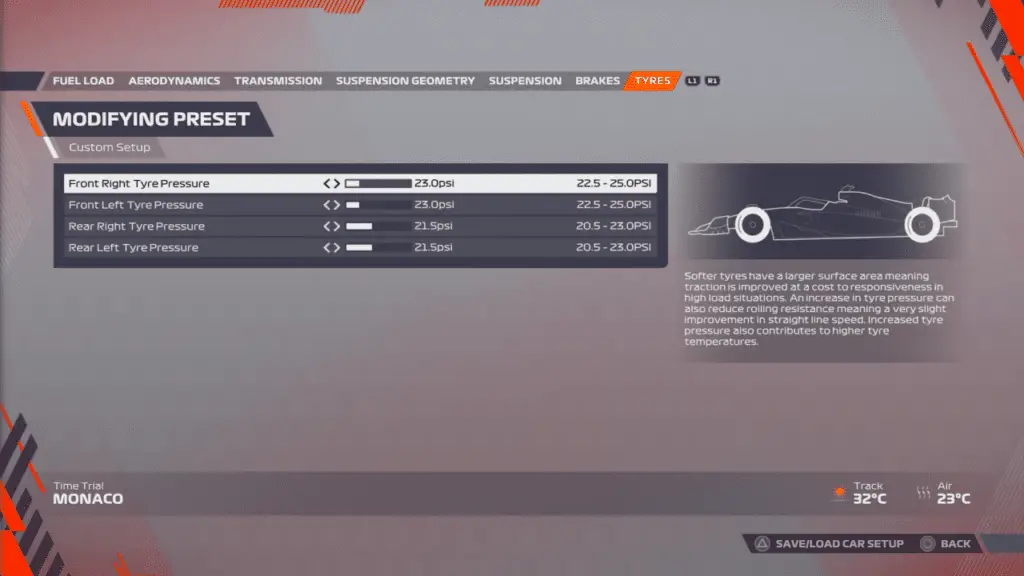
Tyres
Front Right Tyre Pressure – 23.0 psi
Front Left Tyre Pressure – 23.0 psi
Rear Right Tyre Pressure – 21.5 psi
Rear Left Tyre Pressure – 21.5 psi
Tyre pressures can have a huge impact on wear and traction. Typically high rear pressures and lower front pressures are the way to go, however increasing all pressures here will result in faster lap times. You will pay in wear wear, but if you are finding this not to be an issue then increase to around 24psi.
Monaco Hotlap Setup
We are still working on the fastest setup for the hotlap! Unfortunately writers at F1setups.com do this for free, so full time jobs keep us away from developing faster and faster setups for the game as quickly as we would like… But rest assured you will find this updated in a few days, and then again and again each time one of us goes faster!
